Introduction
Sparkle is a simple chat based application where a user can chat another user based on one to one, one to many, broadcast or group chat. Sparkle is based on .NET Core as it’s backend application and angular as it’s frontend application. Sparkle has also feature for one to one audio/video chat which is based on WebRTC. Notable technology used to build backed for sparkle is SignalR, which allows server code to send asynchronous notification to client side application. In this document, we will focus on the backend application of Sparkle.
Tools used
- NET Core Web API
- Angular
- WebRTC
ASP.NET Core SignalR
ASP.NET SignalR is a library for ASP.NET developers to add real-time web functionality to their applications. Real-time web functionality is the ability to have server-side code push content to the connected clients as it happens, in real-time. SignalR takes advantage of several transports, automatically selecting the best available transport given the client’s and server’s best available transport. SignalR takes advantage of WebSocket, an HTML5 API that enables bi-directional communication between the browser and server. SignalR will use WebSockets under the covers when it’s available, and gracefully fall back to other techniques and technologies when it isn’t, while the application code remains the same. SignalR also provides a simple, high-level API for doing server-to-client RPC (call JavaScript functions in a client’s browser from server-side .NET code) in an ASP.NET application, as well as adding useful hooks for connection management, such as connect/disconnect events, grouping connections, authorization.
WebRTC
WebRTC is a free, open project that provides browsers and mobile applications with Real-Time Communications (RTC) capabilities via simple APIs. The WebRTC components have been optimized to best serve this purpose. Its mission is to enable rich, high-quality RTC applications to be developed for the browser, mobile platforms, and IoT devices, and allow them all to communicate via a common set of protocols. The WebRTC initiative is a project supported by Google, Mozilla and Opera, amongst others. It allows audio and video communication to work inside web pages by allowing direct peer-to-peer communication, eliminating the need to install plugins or download native apps.
WebRTC supporting browser access not only network, but possibility to detect out public and local IP address via STUN(Session Traversal Utilities for NAT) protocol to establish p2p connections.
Note that in order to use WebRTC, client side application and server side application must be both hosted securely with SSL certificate.
WebRTC Architecture
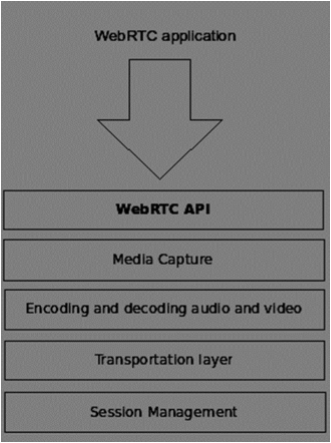
- Media Capture: Detect and get access to camera/microphone and get user permission
- Encoding and Decoding Audio & Video: Splitting of video frame and Audio Waves into smaller chunks and compress them using algorithm codec. There are also many codec’s inside WebRTC like H.264, iSAC, Opus and VP8. When two browsers connect together, they choose the most optimal supported codec between two users. Fortunately, WebRTC does most of the encoding behind the scenes.
- Transportation Layer: The transportation layer manages the order of packets, deal with packet loss and connecting to other users. Again the WebRTC API gives us an easy access to events that tell us when there are issues with the connection.
- Session Management: Deals with managing, opening and organizing connections. This is commonly called signaling. If you transfer audio and video streams to the user it also makes sense to transfer collateral data.
Session Description Protocol (SDP)
The Session Description Protocol (SDP) is a format for describing streaming media communications parameters. SDP is used for describing multimedia communication sessions for the purposes of session announcement, session invitation, and parameter negotiation. SDP does not deliver any media by itself but is used between endpoints for negotiation of media type, format, and all associated properties. The set of properties and parameters are often called a session profile.
It is a string-based profile with all the information about the user’s device which includes information about media streams, media codec’s, network topologies and other device information.
ASP.NET Core project structure
The structure of the server side application can be seen as in the provided figure.
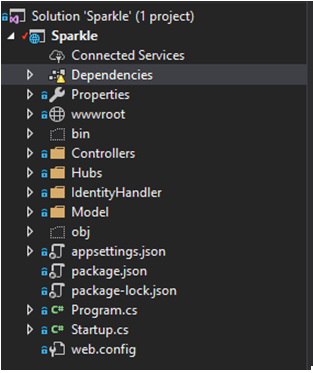
- Startup.cs : This class configures all the app’s request pipeline and services. Services like JWT Authentication, CORS, Swagger and SignalR for Sprakle are all configured in this class.
- IdentityHandler: It contains ApplicationDbContext
- Models: It contains POCO for sparkle project
- Controllers: Defines API controllers of Spark
- Hub: Defines SignalR hub controller
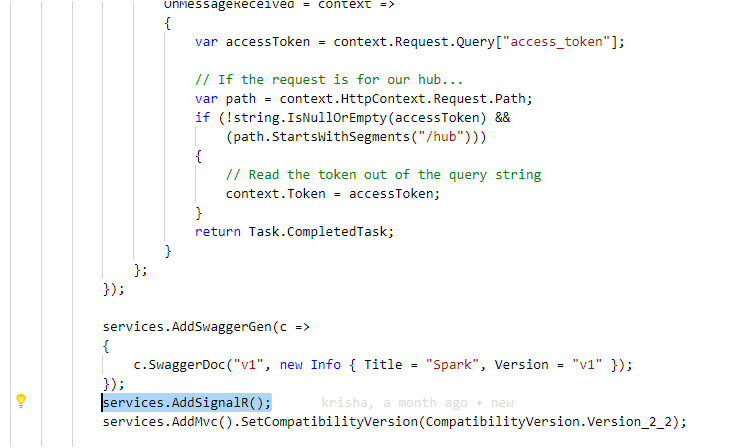
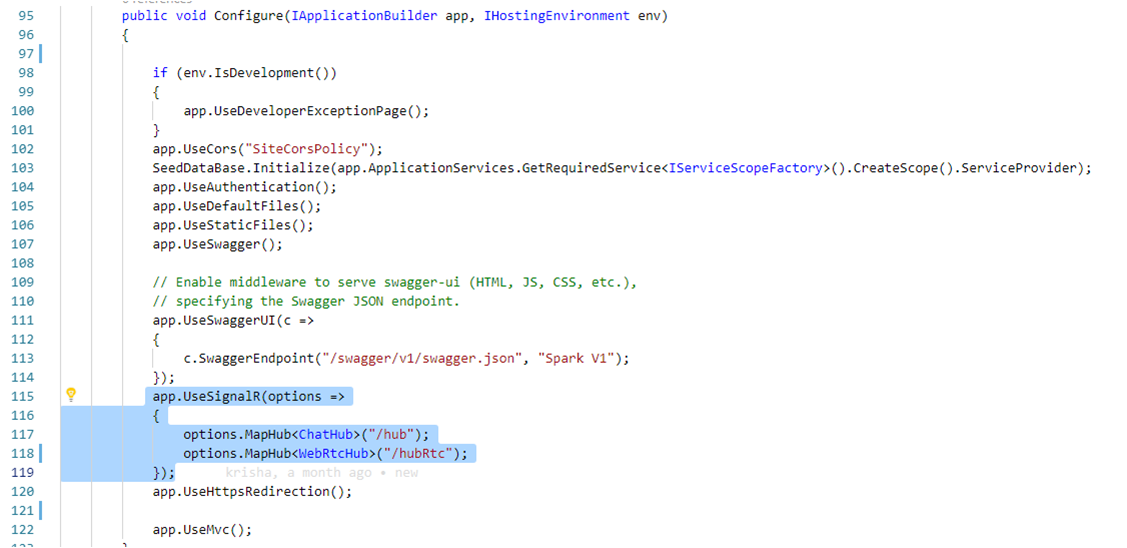
Configuration of SignalR and WebRTC in ASP.NET Core (Backend)
The SignalR server must be configured in startup.cs to pass SignalR requests to SignalR. we need to add services.AddSignalR(); in ConfigureService() method and app.UseSignalR(options=> { options.MapHub<ChatHub>(“/hubâ€); });   in Configure method.
Sending notification to client side with SignalR
Notification can be sent in SignalR to a single or multiple client/group or all users. Following are the ways to send notification to client side application.
Sending notification to clients using connection id
- Clients.All(): Sends notification to all the connected users
- Clients.Client(connectionId): Sends notification to single user based on his/her connection id
- Clients.Clients(listOfConnectionId): Sends notification to list of users included in IEnumerable of string which contains connection id
- Clients.AllExcept(listOfConnectionId): Sends notification to list of users excluded in IEnumerable of string which contains connection id
Sending notification to clients using Identity Name(username)
- Clients.User(userId): Sends notification to single user based on his/her username
- Clients.Users(listOfUserIds): Sends notification to list of users included in IEnumerable of string which contains usernames
Modification of Group
- Groups.AddToGroupAsync(Context.ConnectionId, groupName): Adds a single user based on connection id to a group. If group doesn’t exist, SignalR automatically creates a new group.
- Groups.RemoveFromGroupAsync(Context.ConnectionId, groupName): Removes a single user based on connection id to a group.
Sending notification to group
- Clients.Group(groupName): Sends notification to single group
- Clients.Groups(listOfGroupNames): Sends notification to list of group which is based on IEnumerable of string which contains name of a group.
- Clients.GroupExcept(Clients.Groups(listOfGroupNames): Sends notification to list of group excluded which is based on IEnumerable of string which contains name of a group.
ChatHub.cs
All major tasks of this project is based upon this class which inherits Hub class of AspNetCore.SignalR. In order to get user information through JWT token, we need to add Authorize attribute on the top of the class definition. Over-ridable methods inherited from Hub are:
- OnConnectedAsync() : Called when a new connection is established with the hub.
- OnDisconnectedAsync() : Called when a connection with the hub is terminated.
- Dispose: Releases all resources currently used by this Microsoft.AspNetCore.SignalR.Hub instance.
There are numerous methods in ChatHub.cs but we will focus on those methods related with WebRTC only in this article.
Join() method
public async Task Join(string userName, string roomName)
    {
      var user = User.Get(userName, Context.ConnectionId);
      var room = Room.Get(roomName);

      if (user.CurrentRoom != null)
      {
        room.Users.Remove(user);
        await SendUserListUpdate(Clients.Others, room, false);
      }

      var callers = roomName.Split("-calling-");

      if (callers.Length == 2) //one to one call
      {
        var caller = callers[0];
        var receiver = callers[1];

        if (Context.UserIdentifier.Equals(caller))
        {
          //send incoming call message to receiver
          await Clients.User(receiver).SendAsync("incomingCall", room, caller);
        }
        else if (Context.UserIdentifier.Equals(receiver))
        {
          var callerUser = User.GetByUsername(caller);
          var receiverUser = User.GetByUsername(receiver);

          //add both users to group
          room.Users.Add(callerUser);
          room.Users.Add(receiverUser);

          //current room

          callerUser.CurrentRoom = room;
          receiverUser.CurrentRoom = room;

          await Clients.Users(callers).SendAsync("callToUserList", room.Name, room.Users);
          await Clients.Users(callers).SendAsync("usersInCall", room.Name, room.Users);
        }
      }
      else
      {
        user.CurrentRoom = room;
        room.Users.Add(user);

        await SendUserListUpdate(Clients.Caller, room, true);
        await SendUserListUpdate(Clients.Others, room, false);

      }

    }
This method is invoked when a receiver user accepts a call from a caller user. It retrieves user’s objects and removes from room if involved in any. Then it checks if roomName contains any string ‘-calling-‘, if yes then splits the string into array. If current user is a caller, ‘incomingCall’ client side notification is sent,else if current user is a receiver user, then both caller and receiver are added to a room and then sent client side notifications.
HangUp() method
public async Task HangUp()
    {
      try
      {
        var callingUser = User.Get(Context.ConnectionId);

        if (callingUser == null)
        {
          return;
        }

        if (callingUser.CurrentRoom != null)
        {
          callingUser.CurrentRoom.Users.Remove(callingUser);
          await SendUserListUpdate(Clients.Others, callingUser.CurrentRoom, false);
        }

        User.Remove(callingUser);
      }
      catch (Exception exp)
      {

      }
    }
This method is invoked when any user ends a call, will be invoked for both caller and receiver. It removes user from a room and the a user list update by sending client side notification.
SendSignal() method
public async Task SendSignal(string signal, string targetConnectionId)
    {
      var callingUser = User.Get(Context.ConnectionId);
      var targetUser = User.Get(targetConnectionId);

      // Make sure both users are valid
      if (callingUser == null || targetUser == null)
      {
        return;
      }

      await Clients.Client(targetConnectionId).SendAsync("receiveSignal", callingUser, signal);
    }
This method receives and sends client side notification with Session Description Protocol (SDP) as data which contains string based profile with all the information about user’s device. SDP Includes information about media streams, media device, media codec etc.
SendUserListUpdate() method
private async Task SendUserListUpdate(IClientProxy to, Room room, bool callTo)
    {
      await to.SendAsync(callTo ? "callToUserList" : "updateUserList", room.Name, room.Users);
    }
This method sends client side notification with updated user list in a room.
GetConnection() method
public string GetConnectionId()
    {
      return Context.ConnectionId;
    }
This method provides connection id of SignalR hub of a user.
HangupNotificaton() method
public async Task HangupNotification(string caller, string receiver)
    {
      var callers = new List<string>
      {
        caller,
        receiver
      };
      await Clients.Users(callers).SendAsync("callEnded", caller, receiver);
    }
This method is invoked when any user ends a call. It will update both user to leave the room.
Configuration of SignalR and WebRTC in Angular (Frontend)
In order to work with SignalR in Angular, we need to install @angular/signalr from NPM. we can simply install by following node command
npm i @aspnet/signalr
Similarly, we’ll also need to add WebRTC adapter which can be installed from following node command
npm i webrtc-adapter
Setting up hub with HubConnectionBuilder
setHubConnection() {

        if (this._hubConnection === undefined) {
            this._hubConnection = new signalR.HubConnectionBuilder()
                .withUrl(`${this._sparkUrl}/hub`, {
                    accessTokenFactory: () => {
                        return window.sessionStorage.getItem('token');
                    }
                } as signalR.IHttpConnectionOptions)
                .configureLogging(signalR.LogLevel.Error)
                .build();
        }

        return this._hubConnection;

    }
Above code is used to connect with the SignalR hub of server side where _sparkUrl refers to the https endpoint of server side application.
Invoking a hub in server-side
this._hubConnection.invoke("HangupNotification", this.callerUsername, this.receiverUsername);
Above code is an example of how we can invoke a method of HubConnection in server side. We will simple call invoke() method of HubConnection.
Handling a hub notification sent from server
this._hubConnection.on("usersInCall", (roomName: string, users: User[]) => {
            this.isCallReceived = true;
            this.isInCall = true;
        })
Above code displays on how we can listen and handle notification sent from the server side. We will use on() method of HubConnection and pass in expected function name as a first parameter and the expected data’s along with its format.
Rtc-signalr.service.ts
RtcSignalRService is the most important class related with WebRTC in our Sparkle project. It contains all the method used to connect, modify the RTC connections, establish calls, send signals, hangup calls etc. All major methods used within this class can be explained as below:
Constructor()
constructor(private authService: AuthenticationService) {
    this.checkUserMediaDevices();
    this._hubConnection = this.authService.setHubConnection();

    (async () => {
      try {
        await this._hubConnection.start();
        const connectionId = await this._hubConnection.invoke('GetConnectionId');
        this.currentConnectionId = connectionId;
        this.connected = true;
        this.closeAllVideoCalls();
        this.connSub.next(true);

       // callToUserList

       // updateUserList

       // receiveSignal

      } catch (error) {
        console.error(error);
      }
    })();
      await this.updateUserList(users);
        }
      });
  }
Â
Constructor is the first method which is implemented when a service is defined. Its main role here is to establish a connection with hub. It closes all the existing calls. It also assigns hub notification listener for ‘callToUserList’, ‘updateUserList’ and ‘receiveSignal’, which have been skipped on above code due to the length of code.
updateUserList() method
private async updateUserList(users: IUser[]): Promise<void> {
    const iceServers = await this.getIceServers();

    users.forEach(async user => {
      const connection = this.getConnection(user.connectionId, iceServers);

      if (connection.user.userName !== user.userName) {
        connection.user.userName = user.userName;
      }

      if (connection.isCurrentUser && connection.streamSub.getValue() === undefined) {
        const stream = await this.getUserMediaInternal();
        if (connection.streamSub.getValue() === undefined) {
          connection.streamSub.next(stream);
        }
      }
    });

    this.usersSub.next(Object.values(this._connections));
  }
This method is implemented when a SendUserListUpdate() method of server side is invoked. It updates the active users in a current connected room.
Join() method
public join(userName: string, room: string) {
    if (!this.connected) {
      this.reset();
      return;
    }

    this.closeAllVideoCalls();
    this._connections[this.currentConnectionId] =
      new UserConnection({ userName: userName, connectionId: this.currentConnectionId }, true, undefined);
    this.currentRoomName = room;
    this._hubConnection
      .invoke('Join', userName, room);
  }
Â
This method is implemented when receiver accepts a call. If a user is connected to other room, then it resets the connection and close all video calls of that user and then invokes Join() method of server side application.
hangUp() method
public hangUp() {
    this._hubConnection.invoke('hangUp');
    this.closeVideoCall(this.currentConnectionId);
  }
This method invokes HangUp() method of server side and then closes all existing calls of a user
getUserMediaInternal() method
private async getUserMediaInternal(): Promise<MediaStream> {
    if (this.currentMediaStream) {
      return this.currentMediaStream;
    }

    try {
      return await navigator.mediaDevices.getUserMedia({
        video: this.hasVideoInput,
        audio: this.hasAudioInput
      });
    } catch (error) {
      console.error('Failed to get hardware access', error);
    }
  }
This method provides access to user’s microphone and webcam if any of these hardware exists in user’s machine.
getIceServers()
private async getIceServers(): Promise<RTCIceServer[]> {
    return null;

    if (this.currentIceServers) {
      return this.currentIceServers;
    }

    try {
      return await this._hubConnection
        .invoke('GetIceServers');
    } catch (error) {
      console.error('GetIceServers error: ', error);
    }
 }
This method provides information of STUN server. It currently returns null. Note that if IceServer is null, it will only work if an application is hosted within LAN connection. Else we will need a STUN server. A list of public stun server can be found in following URL.
initiateOffer method
 private async initiateOffer(acceptingUser: IUser) {
   const partnerClientId = acceptingUser.connectionId;
   console.log('Initiate offer to ' + acceptingUser.userName);
   if (this._connections[partnerClientId]) {
     console.log('Cannot initiate an offer with existing partner.');
     return;
   }
   const iceServers = await this.getIceServers();
   const connection = this.getConnection(partnerClientId, iceServers);
   const localStream = await this.getUserMediaInternal();
   localStream.getTracks().forEach(track => connection.rtcConnection.addTrack(track, localStream));
 }
Â
This method is implemented when receiver joins a room and sends ‘callToUserList’ notification to client side. It gets access to user’s media device and then adds tracks from those media device.
sendSignal() method
private async sendSignal(message: ISignal, partnerClientId: string) {
    await this._hubConnection.invoke('SendSignal', JSON.stringify(message), partnerClientId);
  }
Â
This method invokes SendSignal() method of server side by passing Session Description Protocol(SDP) information in its parameter.
newSignal() method
private async newSignal(user: IUser, data: string) {
    const partnerClientId = user.connectionId;
    const signal: ISignal = JSON.parse(data);
    console.log('WebRTC: received signal');

    if (signal.type === SignalType.newIceCandidate) {
      await this.receivedNewIceCandidate(partnerClientId, signal.candidate);
    } else if (signal.type === SignalType.videoOffer) {
      await this.receivedVideoOffer(partnerClientId, signal.sdp);
    } else if (signal.type === SignalType.videoAnswer) {
      await this.receivedVideoAnswer(partnerClientId, signal.sdp);
    }

  }
This method is implemented when SendSignal() method is invoked in server side. It identifies if signal is a new ice candidate (implements receivedNewIceCandidate() ), new offer (implements receivedVideoOffer() )or offer acceptance (implements receivedVideoAnswer()).
receivedNewIceCandidate() method
private async receivedNewIceCandidate(partnerClientId: string, candidate: RTCIceCandidate) {
    console.log('Adding received ICE candidate: ' + JSON.stringify(candidate));

    try {
      const iceServers = await this.getIceServers();
      const connection = this.getConnection(partnerClientId, iceServers);
      await connection.rtcConnection.addIceCandidate(candidate);
    } catch (error) {
      console.error('Error adding ICE candidate:', error);
    }

  }
Â
This method adds received ice candidate to RTCConnection.
receivedVideoOffer() method
private async receivedVideoOffer(partnerClientId: string, sdp: RTCSessionDescription) {

    console.log('Starting to accept invitation from ' + partnerClientId);

    const desc = new RTCSessionDescription(sdp);
    const iceServers = await this.getIceServers();
    const connection = this.getConnection(partnerClientId, iceServers);

    if (connection.creatingAnswer) {
      console.warn('Second answer not created.');
      return;
    }

    connection.creatingAnswer = true;

    try {
      console.log('setRemoteDescription');
      await connection.rtcConnection.setRemoteDescription(desc);
      console.log('createAnswer');
      const senders = connection.rtcConnection.getSenders();

      if (!senders || senders.length === 0) {
        console.log('AddSenders needed');
        const localStream = await this.getUserMediaInternal();

        localStream.getTracks().forEach(track => connection.rtcConnection.addTrack(track, localStream));
      }

      const answer = await connection.rtcConnection.createAnswer();

      console.log('setLocalDescription', answer);

      await connection.rtcConnection.setLocalDescription(answer);

      console.log(`connection`);
      console.log(connection);

      await this.sendSignal({
        type: SignalType.videoAnswer,
        sdp: connection.rtcConnection.localDescription
      }, partnerClientId);
    } catch (error) {
      console.error('Error in receivedVideoOffer:', error);
    }

    connection.creatingAnswer = false;
  }
This method accepts offer invitation from caller/receiver, sets remote descriptions and then creates offer answer, then sets local description and sends signal.
receivedVideoAnswer() method
 private async receivedVideoAnswer(partnerClientId: string, sdp: RTCSessionDescription) {
   console.log('Call recipient has accepted our call');
   try {
     const iceServers = await this.getIceServers();
     const connection = this.getConnection(partnerClientId, iceServers);
     await connection.rtcConnection.setRemoteDescription(sdp);
   } catch (error) {
     console.error('Error in receivedVideoAnswer:', error);
   }
 }
This method sets remote description when a call has been accepted by sending Session Description Protocol (SDP).
getConnection() method
private getConnection(partnerClientId: string, iceServers: RTCIceServer[]): UserConnection {
    const connection = this._connections[partnerClientId] || this.createConnection(partnerClientId, iceServers);
    return connection;
  }
This method is used to create a WebRTC connection between a local computer and remote peer. Firstly, all existing calls of a user is closed if there are any. Then it creates a new RTCPeerConnection and listens to its events like ‘onnegotiationneeded’, ‘oniceconnectionstatechange’, ‘onicegatheringstatechange’, ‘onsignalingstatechange’, ‘onicecandidate’, ‘onconnectionstatechange’ and ‘ontrack’. Some of the key methods of RTCPeerConnections are:
- RTCPeerConnection(configuration) : a constructor, which returns a new RTCPeerConnection object
- .addTrack(mediaStream): attaches a MediaStream as a local audio/video source
- .createOffer() : creates offer session description
- .createAnswer(): creates answer session description
- .setLocalDescription() : sets description as local session description
- .setRemoteDescription() : sets description as remote session description
- .close() : dispose RTCPeerConnection object
closeAllVideoCalls() method
private closeAllVideoCalls() {
    Object.keys(this._connections)
      .forEach(key => {
        this.closeVideoCall(key);
      });
    this._connections = {};
  }


private closeVideoCall(partnerClientId: string) {
    const connection = this._connections[partnerClientId];

    if (connection) {
      connection.end();
      this._connections[partnerClientId] = undefined;
    }
  }
Â
This method closes all the active webrtc connections.
Configuration of API endpoints
Url endpoints should be carefully configured in following three files.
Appsettings.json (backend): Here ‘Origin’ refers to the application URL of frontend application and ‘ApiUrl’ refers to the application URL of server side application.
"AppSettings": {

    "Origin": "http://localhost:4200",

    "ApiUrl": "https://localhost:5001",

    "SecretKey": "MySuperSecretKey"


  }
Authentication.service.ts  and User.service.ts (frontend): Both of these classes have a property named _sparkUrl. This URL should point to the API url of server side application.
public _sparkUrl: string = "https://localhost:5001";
Demonstration
All the codes used for this project can be found in git repository. Audio/Video chat is one of the feature of Sparkle. There are also many other feature in this application like private text chat, broadcasting message, group chat and file transfer.
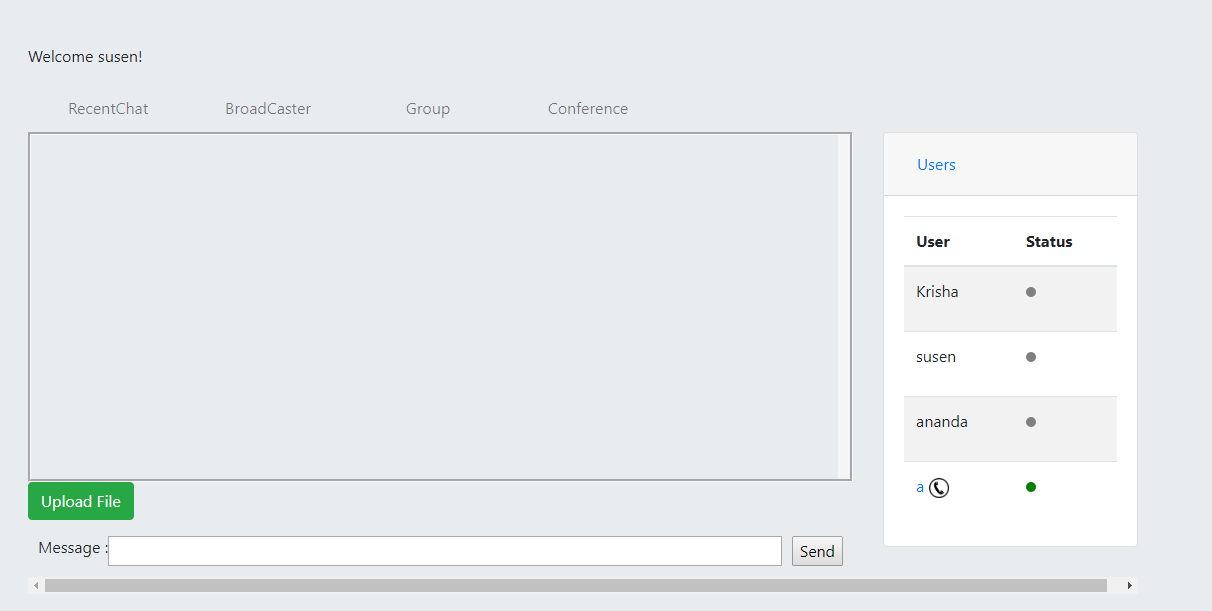
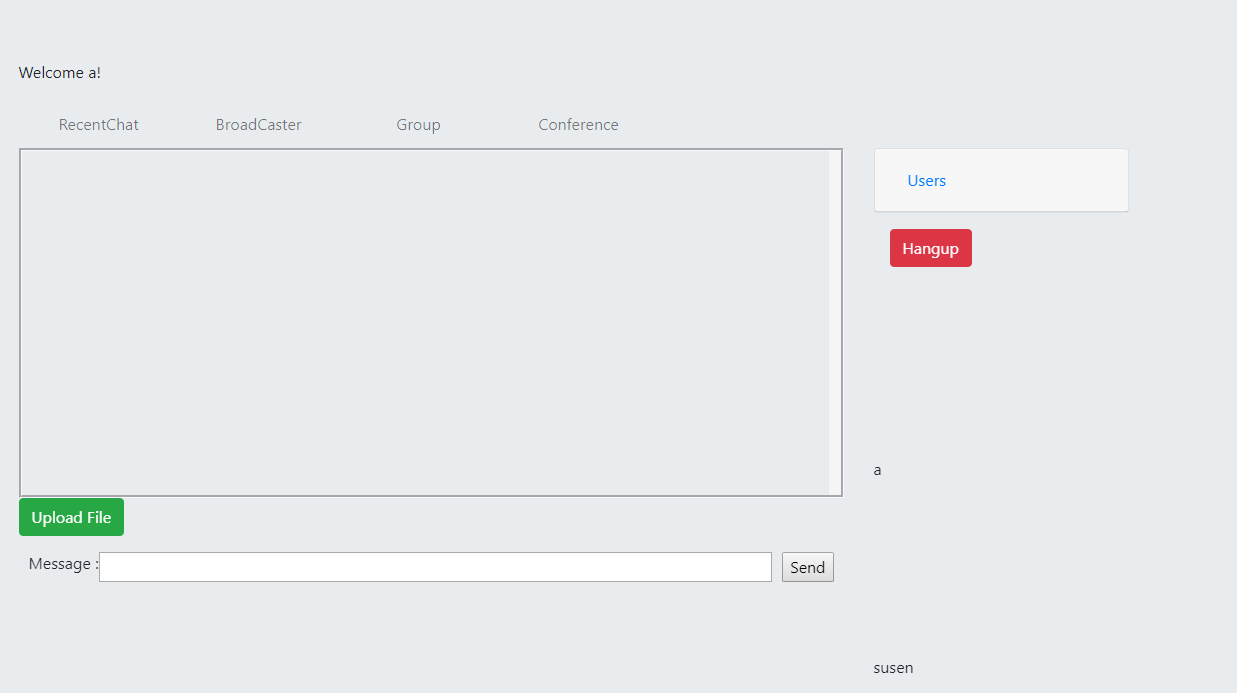
This is a homepage of one user who will be a caller in this demo. In order to call, user will need to click call icon at users tab.
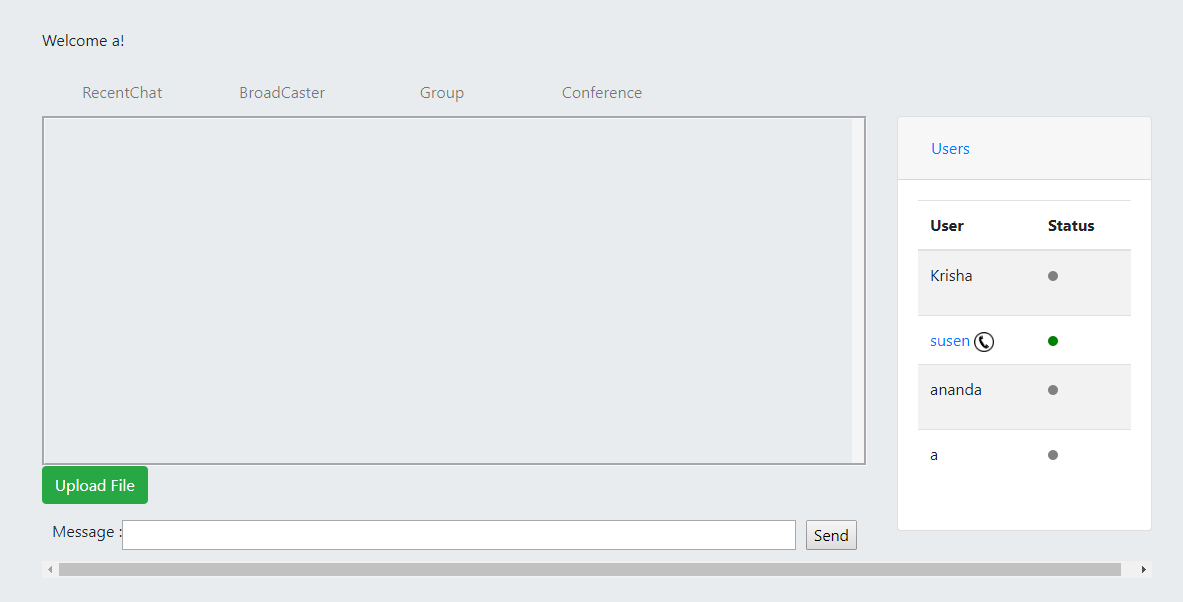
And this is a homepage of a receiver user who’ll need to accept a call once a caller sends a call request.
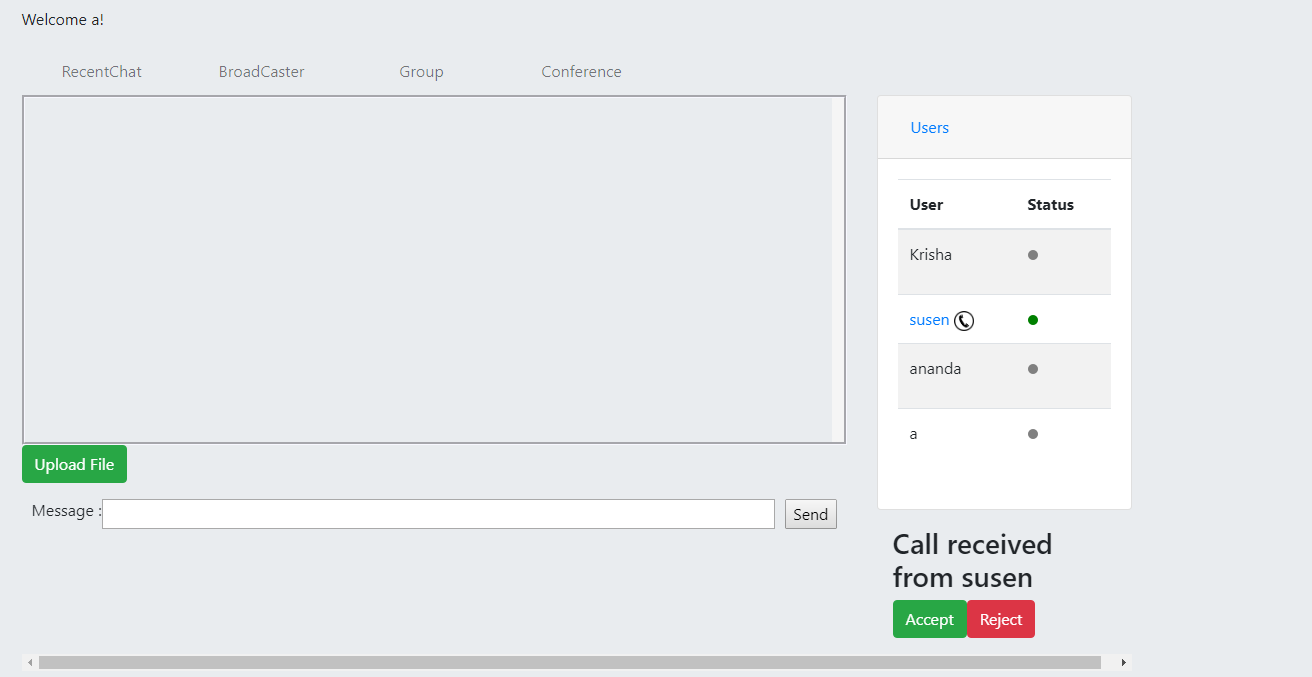
Once a caller sends a request for a call, notification will be displayed to whether accept or reject a call.
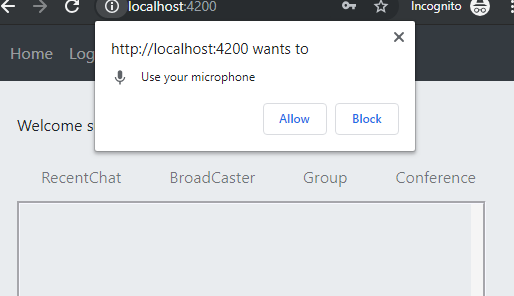
If accepted, user will need to allow permission to use microphone/webcam.
This is how a user interface will look when there is microphone but no webcam. Users can interact with voice in this case.

And this how a User interface will look like when a device has webcam.
All the codes used for this project can be found in git repository. Audio/Video chat is one of the feature of Sparkle. There are also many other feature in this application like private text chat, broadcasting message, group chat and file transfer.
References
- https://angular.io/docs
- https://docs.microsoft.com/en-us/aspnet/core/signalr/introduction?view=aspnetcore-2.2
- https://github.com/pacoferre/netcore-signalr-angular-webrtc
- http://jasonwatmore.com/post/2018/08/14/aspnet-core-21-jwt-authentication-tutorial-with-example-api
- https://tools.ietf.org/id/draft-ietf-rtcweb-jsep-21.html
Nice Article!!